Springboot事件详解
1、是什么
Spring的事件(Application Event)为Bean与Bean之间的消息通信提供了支持
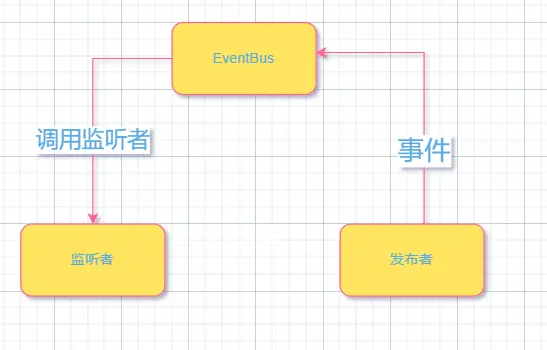
事件机制中有三种角色:发布事件者、事件、事件监听者
发布事件者:发布事件的对象
事件:事件的具体内容
事件监听者:等待处理时间的对象
2、内置有哪些事件
先看下类图,看的很明白
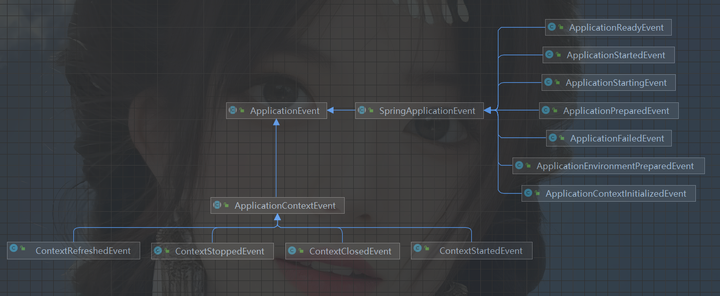
图上可以看到ApplicationEvent有两个子类
ApplicationContextEvent 是Spring提供的事件监听,包路径为:org.springframework.context.event
SpringApplicationEvent 是Springboot的扩展事件,包路径为:org.springframework.boot.context.event
区别懂了吗
Spring提供5种标准的事件监听:
- 上下文更新事件(ContextRefreshedEvent):该事件会在ApplicationContext被初始化或者更新时发布。也可以在调用ConfigurableApplicationContext接口中的refresh()方法时被触发。
- 上下文开始事件(ContextStartedEvent):当容器ConfigurableApplicationContext的Start()方法开始/重新开始容器时触发该事件。
- 上下文停止事件(ContextStoppedEvent):当容ConfigurableApplicationContext的Stop()方法停止容器时触发该事件。
- 上下文关闭事件(ContextClosedEvent):当ApplicationContext被关闭时触发该事件。容器被关闭时,其管理的所有单例Bean都被销毁。
- 请求处理事件(RequestHandledEvent):在Web应用中,当一个http请求(request)结束触发该事件。
Spring Boot扩展了Spring的ApplicationContextEvent,提供了四种事件:
- ApplicationStartedEvent :spring boot启动开始时执行的事件
- ApplicationEnvironmentPreparedEvent:spring boot 对应Enviroment已经准备完毕,但此时上下文context还没有创建。
- ApplicationPreparedEvent:spring boot上下文context创建完成,但此时spring中的bean是没有完全加载完成的。
- ApplicationFailedEvent:spring boot启动异常时执行事件
3、自定义
内置的事件再多也无法满足自定义的需要,所以怎么实现自己的事件才是我们学习的目标,理解这套框架
3.1 新建一个Springboot web项目
一路next就好,勾选web,别犹豫
3.2 创建自定义事件,继承ApplicationEvent
这里只是加了一个name,在正常开发中,可以设置一些自定义的属性
public class CarawayEvent extends ApplicationEvent {
    private final String name;
    public CarawayEvent(Object source, String name) {
        super(source);
        this.name = name;
    }
    public String getName() {
        return name;
    }
}
3.3 创建监听器Listener,实现ApplicationListener
这里的泛型用你监听的事件类型
import org.springframework.context.ApplicationListener;
import org.springframework.stereotype.Component;
@Component
public class CarawayEventListener implements ApplicationListener<CarawayEvent> {
    @Override
    public void onApplicationEvent(CarawayEvent event) {
        System.out.println(event.getName());
    }
}
3.4 发布事件
这边写了一个接口,使用了ApplicationEventPublisher发布事件
@RestController
public class TestController {
    @Autowired
    private ApplicationEventPublisher publisher;
    @GetMapping("/")
    public String test(HttpServletRequest request){
        CarawayEvent event = new CarawayEvent(this, "香菜");
        publisher.publishEvent(event);
        return "hello";
    }
}
4、看源码
看源码的方式很简单,把上面大代码写好,一步一步debug就好了
4.1 注册
直接进到方法 org.springframework.context.support.AbstractApplicationContext#registerListeners
这里只能注册实现了ApplicationListener的bean

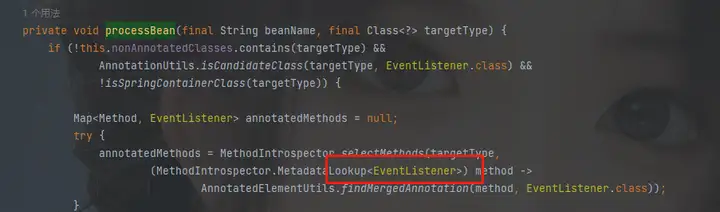
注解方式的通过 org.springframework.context.support.AbstractApplicationContext#finishBeanFactoryInitialization
最终进入到org.springframework.context.event.EventListenerMethodProcessor#processBean
4.2 ApplicationEventMulticaster
ApplicationEventMulticaster是spring中事件广播器接口,负责事件的广播发布。
AbstractApplicationContext中使用initApplicationEventMulticaster()初始化事件广播器。
- 如果容器里面有名为applicationEventMulticaster的bean,这将该bean设为上下文中的事件广播器。
- 如果容器里面没有applicationEventMulticaster的bean,默认创建SimpleApplicationEventMulticaster来代替
/**
 * Initialize the ApplicationEventMulticaster.
 * Uses SimpleApplicationEventMulticaster if none defined in the context.
 * @see org.springframework.context.event.SimpleApplicationEventMulticaster
 */
protected void initApplicationEventMulticaster() {
   ConfigurableListableBeanFactory beanFactory = getBeanFactory();
   if (beanFactory.containsLocalBean(APPLICATION_EVENT_MULTICASTER_BEAN_NAME)) {
      this.applicationEventMulticaster =
            beanFactory.getBean(APPLICATION_EVENT_MULTICASTER_BEAN_NAME, ApplicationEventMulticaster.class);
      if (logger.isTraceEnabled()) {
         logger.trace("Using ApplicationEventMulticaster [" + this.applicationEventMulticaster + "]");
      }
   }
   else {
      this.applicationEventMulticaster = new SimpleApplicationEventMulticaster(beanFactory);
      beanFactory.registerSingleton(APPLICATION_EVENT_MULTICASTER_BEAN_NAME, this.applicationEventMulticaster);
      if (logger.isTraceEnabled()) {
         logger.trace("No '" + APPLICATION_EVENT_MULTICASTER_BEAN_NAME + "' bean, using " +
               "[" + this.applicationEventMulticaster.getClass().getSimpleName() + "]");
      }
   }
}
4.3 触发流程
最终在org.springframework.context.event.SimpleApplicationEventMulticaster#multicastEvent 触发

5、杂项
5.1 Spring Boot事件监听有四种方式
- 手工向ApplicationContext中添加监听器
ConfigurableApplicationContext context = SpringApplication.run(Application.class, args);
context.addApplicationListener(new CarawayListener());//这里注册事件监听器- 在application.properties中配置监听器
context.listener.classes=com.com.xin.event.CarawayEventListener- 使用@Component 注解
就是上面3.3自定义的方式
- 通过@EventListener注解实现事件监听
import org.springframework.context.event.EventListener;
import org.springframework.stereotype.Component;

@Component
public class CarawayAnnotationListener {
    @EventListener
    public void listener1(CarawayEvent event) {
        System.out.println("listener1  -- " + event.getName());
    }

    @EventListener
    public void listener2(CarawayEvent event) {
        System.out.println("listener2  -- " + event.getName());
    }
}
5.2 自定义线程池
在翻代码的时候发现事件有一个属性是taskExecutor,这个一看就是线程池,
如果不配置线程池所有的事件在主线程中执行。
自己配一个
@Configuration
public class ThreadConfig {
    //BeanName 必须是这个
    @Bean("applicationEventMulticaster")
    public SimpleApplicationEventMulticaster simpleApplicationEventMulticaster(BeanFactory beanFactory, ThreadPoolTaskExecutor carawayExecutor){
        SimpleApplicationEventMulticaster simpleApplicationEventMulticaster
                = new SimpleApplicationEventMulticaster(beanFactory);
        simpleApplicationEventMulticaster.setTaskExecutor(carawayExecutor);
        return simpleApplicationEventMulticaster;
    }
    @Bean("carawayExecutor")
    public ThreadPoolTaskExecutor threadPoolTaskExecutor() {
        ThreadPoolTaskExecutor executor = new ThreadPoolTaskExecutor();
        executor.setCorePoolSize(4);
        executor.setMaxPoolSize(4);
        executor.setThreadNamePrefix("caraway_task_executor_thread");
        executor.initialize();
        return executor;
    }
}
5.3 发布事件的方式
通过ApplicationEventPublisher 发布
通过ApplicationContext接口发布
@RestController
public class TestController {
    @Autowired
    private ApplicationEventPublisher publisher;
    @Autowired
    private ApplicationContext applicationContext;
    @GetMapping("/")
    public String test(HttpServletRequest request){
        CarawayEvent event = new CarawayEvent(this, "香菜");
        publisher.publishEvent(event);
        applicationContext.publishEvent(event);
        return "hello";
    }
}
6、总结
事件机制设计上还是很简单的,使用也很简单,
三个对象:事件源,发布者,监听者
事件的原理也很简单,但是使用的方式很多
扫码领红包 微信赞赏
微信赞赏 支付宝扫码领红包