把SpringBoot项目启动从420秒优化到了40秒!
背景
-
基于 SpringApplicationRunListener 原理观察 SpringBoot 启动 run 方法; -
基于 BeanPostProcessor 原理监控 Bean 注入耗时; -
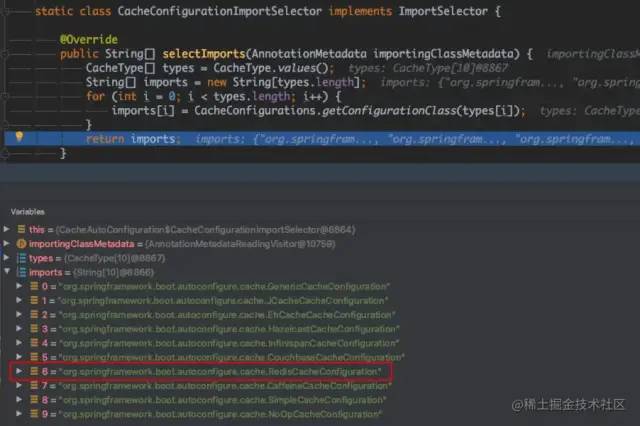
SpringBoot Cache 自动化配置原理; -
SpringBoot 自动化配置原理及 starter 改造;
耗时问题排查
-
排查 SpringBoot 服务的启动过程; -
排查 Bean 的初始化耗时;
1.1 观察 SpringBoot 启动 run 方法
public class Application {
    public static void main(String[] args) {
        SpringApplication.run(Application.class, args);
    }
}

public static ConfigurableApplicationContext run(Class<?>[] primarySources, String[] args) {
    return new SpringApplication(primarySources).run(args);
}
public interface SpringApplicationRunListener {
    // run 方法第一次被执行时调用,早期初始化工作
    void starting();
    // environment 创建后,ApplicationContext 创建前
    void environmentPrepared(ConfigurableEnvironment environment);
    // ApplicationContext 实例创建,部分属性设置了
    void contextPrepared(ConfigurableApplicationContext context);
    // ApplicationContext 加载后,refresh 前
    void contextLoaded(ConfigurableApplicationContext context);
    // refresh 后
    void started(ConfigurableApplicationContext context);
    // 所有初始化完成后,run 结束前
    void running(ConfigurableApplicationContext context);
    // 初始化失败后
    void failed(ConfigurableApplicationContext context, Throwable exception);
}
通过自定义实现 ApplicationListener 实现类,可以在 SpringBoot 启动的不同阶段,实现一定的处理,可见SpringApplicationRunListener 接口给 SpringBoot 带来了扩展性。
public ConfigurableApplicationContext run(String... args) {
    ...
    // 加载所有 SpringApplicationRunListener 的实现类
    SpringApplicationRunListeners listeners = getRunListeners(args);
    // 调用了 starting
    listeners.starting();
    try {
        ApplicationArguments applicationArguments = new DefaultApplicationArguments(args);
        // 调用了 environmentPrepared
        ConfigurableEnvironment environment = prepareEnvironment(listeners, applicationArguments);
        configureIgnoreBeanInfo(environment);
        Banner printedBanner = printBanner(environment);
        context = createApplicationContext();
        exceptionReporters = getSpringFactoriesInstances(SpringBootExceptionReporter.class, new Class[] { ConfigurableApplicationContext.class }, context);
        // 内部调用了 contextPrepared、contextLoaded
        prepareContext(context, environment, listeners, applicationArguments, printedBanner);
        refreshContext(context);
        afterRefresh(context, applicationArguments);
        stopWatch.stop();
        if (this.logStartupInfo) {
            new StartupInfoLogger(this.mainApplicationClass).logStarted(getApplicationLog(), stopWatch);
        }
        // 调用了 started
        listeners.started(context);
        callRunners(context, applicationArguments);
    }
    catch (Throwable ex) {
        // 内部调用了 failed
        handleRunFailure(context, ex, exceptionReporters, listeners);
        throw new IllegalStateException(ex);
    }
    try {
        // 调用了 running
        listeners.running(context);
    }
    catch (Throwable ex) {
        handleRunFailure(context, ex, exceptionReporters, null);
        throw new IllegalStateException(ex);
    }
    return context;
}
@Slf4j
public class MySpringApplicationRunListener implements SpringApplicationRunListener {
    // 这个构造函数不能少,否则反射生成实例会报错
    public MySpringApplicationRunListener(SpringApplication sa, String[] args) {
    }
    @Override
    public void starting() {
        log.info("starting {}", LocalDateTime.now());
    }
    @Override
    public void environmentPrepared(ConfigurableEnvironment environment) {
        log.info("environmentPrepared {}", LocalDateTime.now());
    }
    @Override
    public void contextPrepared(ConfigurableApplicationContext context) {
        log.info("contextPrepared {}", LocalDateTime.now());
    }
    @Override
    public void contextLoaded(ConfigurableApplicationContext context) {
        log.info("contextLoaded {}", LocalDateTime.now());
    }
    @Override
    public void started(ConfigurableApplicationContext context) {
        log.info("started {}", LocalDateTime.now());
    }
    @Override
    public void running(ConfigurableApplicationContext context) {
        log.info("running {}", LocalDateTime.now());
    }
    @Override
    public void failed(ConfigurableApplicationContext context, Throwable exception) {
        log.info("failed {}", LocalDateTime.now());
    }
}
# Run Listenersorg.springframework.boot.SpringApplicationRunListener=\com.xxx.ad.diagnostic.tools.api.MySpringApplicationRunListenerrun 方法中是通过 getSpringFactoriesInstances 方法来获取 META-INF/spring.factotries 下配置的 SpringApplicationRunListener 的实现类,其底层是依赖 SpringFactoriesLoader 来获取配置的类的全限定类名,然后反射生成实例;
这种方式在 SpringBoot 用的非常多,如 EnableAutoConfiguration、ApplicationListener、ApplicationContextInitializer 等。
-
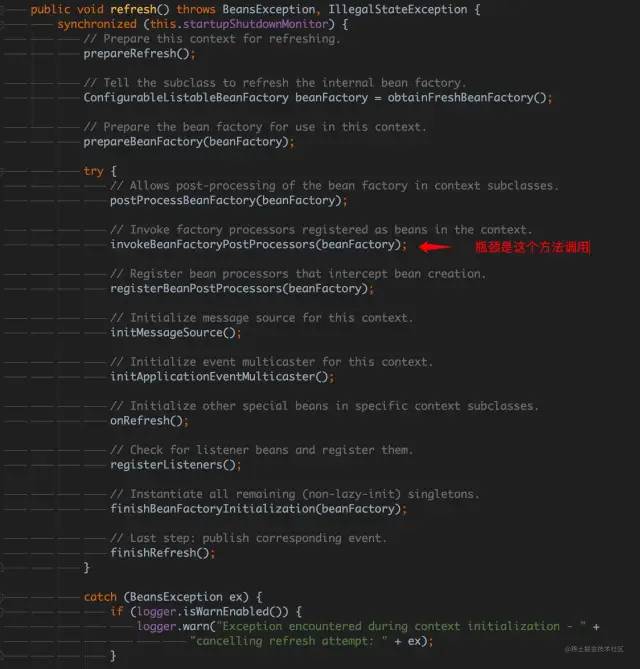
在 invokeBeanFactoryPostProcessors(beanFactory) 方法中,调用了所有注册的 BeanFactory 的后置处理器; -
其中,ConfigurationClassPostProcessor 这个后置处理器贡献了大部分的耗时; -
查阅相关资料,该后置处理器相当重要,主要负责@Configuration、@ComponentScan、@Import、@Bean 等注解的解析; -
继续调试发现,主要耗时都花在主配置类的 @ComponentScan 解析上,而且主要耗时还是在解析属性 basePackages;
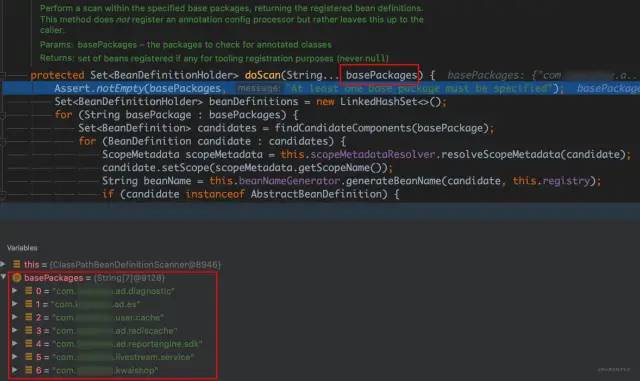
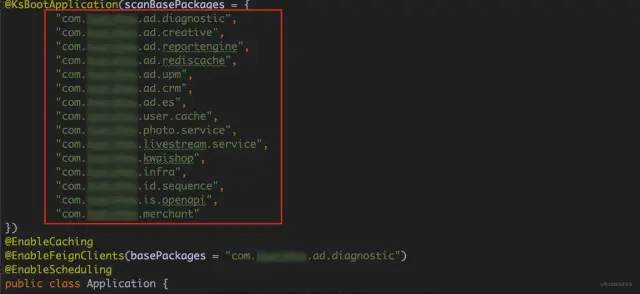
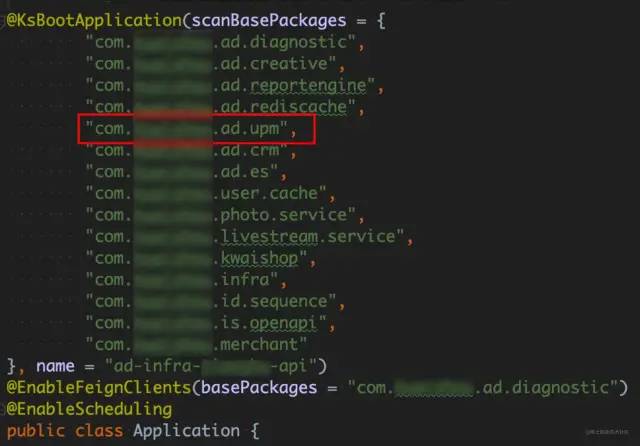
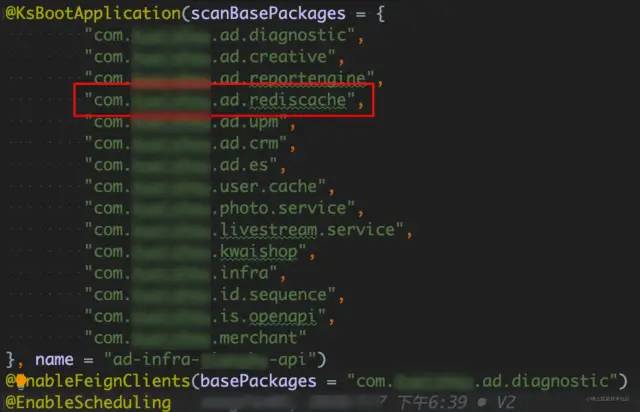
-
作为数据平台,我们的服务引用了很多第三方依赖服务,这些依赖往往提供了对应业务的完整功能,所以提供的 jar 包非常大; -
扫描这些包路径下的 class 非常耗时,很多 class 都不提供 Bean,但还是花时间扫描了; -
每添加一个服务的依赖,都会线性增加扫描的时间;
-
是否所有的 class 都需要扫描,是否可以只扫描那些提供 Bean 的 class? -
扫描出来的 Bean 是否都需要?我只接入一个功能,但是注入了所有的 Bean,这似乎不太合理?
1.2 监控 Bean 注入耗时
public interface BeanPostProcessor {
    // 初始化前
    default Object postProcessBeforeInitialization(Object bean, String beanName) throws BeansException {
        return bean;
    }
    // 初始化后
    default Object postProcessAfterInitialization(Object bean, String beanName) throws BeansException {
        return bean;
    }
}
protected Object initializeBean(String beanName, Object bean, @Nullable RootBeanDefinition mbd) {
    ...
    Object wrappedBean = bean;
    if (mbd == null || !mbd.isSynthetic()) {
        // 应用所有 BeanPostProcessor 的前置方法
        wrappedBean = applyBeanPostProcessorsBeforeInitialization(wrappedBean, beanName);
    }
    try {
        invokeInitMethods(beanName, wrappedBean, mbd);
    }
    catch (Throwable ex) {
        throw new BeanCreationException(
                (mbd != null ? mbd.getResourceDescription() : null),
                beanName, "Invocation of init method failed", ex);
    }
    if (mbd == null || !mbd.isSynthetic()) {
        // 应用所有 BeanPostProcessor 的后置方法
        wrappedBean = applyBeanPostProcessorsAfterInitialization(wrappedBean, beanName);
    }
    return wrappedBean;
}
@Component
public class TimeCostBeanPostProcessor implements BeanPostProcessor {
    private Map<String, Long> costMap = Maps.newConcurrentMap();

    @Override
    public Object postProcessBeforeInitialization(Object bean, String beanName) throws BeansException {
        costMap.put(beanName, System.currentTimeMillis());
        return bean;
    }
    @Override
    public Object postProcessAfterInitialization(Object bean, String beanName) throws BeansException {
        if (costMap.containsKey(beanName)) {
            Long start = costMap.get(beanName);
            long cost  = System.currentTimeMillis() - start;
            if (cost > 0) {
                costMap.put(beanName, cost);
                System.out.println("bean: " + beanName + "\ttime: " + cost);
            }
        }
        return bean;
    }
}

2.1 如何解决扫描路径过多?
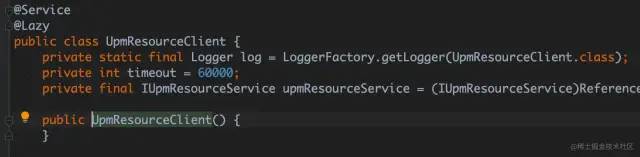
@Configuration
public class ThirdPartyBeanConfig {
    @Bean
    public UpmResourceClient upmResourceClient() {
        return new UpmResourceClient();
    }
}
Tips:如果该 Bean 还依赖其他 Bean,则需要把所依赖的 Bean 都注入;针对 Bean 依赖情况复杂的场景梳理起来就比较麻烦了,所幸项目用到的服务 Bean 依赖关系都比较简单,一些依赖关系复杂的服务,观察到其路径扫描耗时也不是很高,就不处理了。
2.2 如何解决 Bean 初始化高耗时?
新的问题

3.1 SpringBoot 自动化装配,让人防不胜防
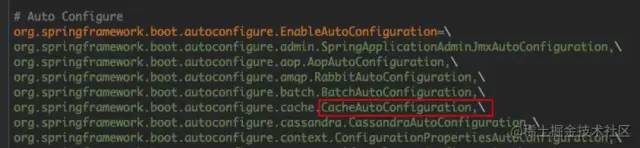
@SpringBootApplication 复合注解中集成了三个非常重要的注解:@SpringBootConfiguration、@EnableAutoConfiguration、@ComponentScan,其中 @EnableAutoConfiguration 就是负责开启自动化配置功能;
SpringBoot 中有多@EnableXXX 的注解,都是用来开启某一方面的功能,其实现原理也是类似的:通过 @Import 筛选、导入满足条件的自动化配置类。
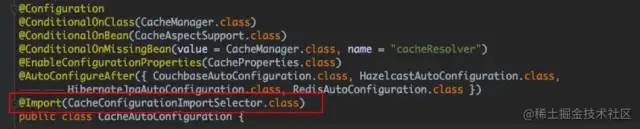

上文多次提到@Import,这是 SpringBoot 中重要注解,主要有以下作用:
1、导入 @Configuration 注解的类;
2、导入实现了 ImportSelector 或 ImportBeanDefinitionRegistrar 的类;
3、导入普通的 POJO。
3.2 使用 starter 机制,开箱即用
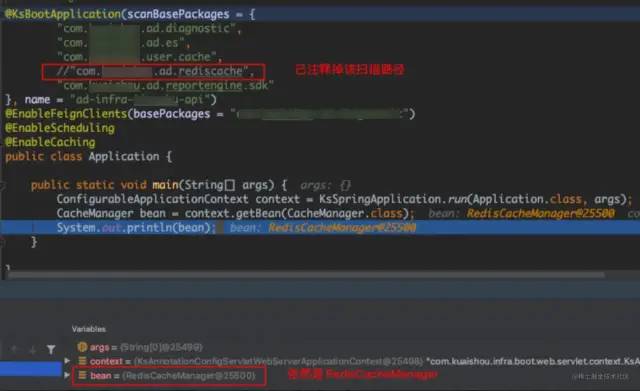
# EnableAutoConfigurations
org.springframework.boot.autoconfigure.EnableAutoConfiguration=\
com.xxx.ad.rediscache.XxxAdCacheConfiguration
扫码领红包SpringBoot 的 EnableAutoConfiguration 自动配置原理还是比较复杂的,在加载自动配置类前还要先加载自动配置的元数据,对所有自动配置类做有效性筛选,具体可查阅 EnableAutoConfiguration 相关代码;
 微信赞赏
微信赞赏 支付宝扫码领红包
声明:本站所有文章,如无特殊说明或标注,均为本站原创发布。任何个人或组织,在未征得本站同意时,禁止复制、盗用、采集、发布本站内容到任何网站、书籍等各类媒体平台。如若本站内容侵犯了原著者的合法权益,可联系我们进行处理。侵权投诉:375170667@qq.com