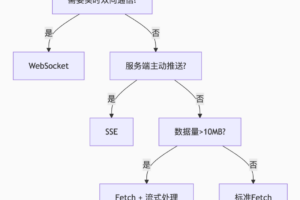
90行代码,15 个元素教你如何实现无限滚动
-
IntersectionObserver API的用法,以及如何兼容。 -
如何在React Hook中实现无限滚动。 -
如何正确渲染多达10000个元素的列表。
早期的解决方案
fetch(path).then(res => doSomeThing(res.data));
}window.addEventListener(‘scroll’, fetchData);
-
scroll事件会频繁触发,因此我们还需要手动节流。 -
滚动元素内有大量DOM,容易造成卡顿。
交叉观察者:IntersectionObserver
const intersectionObserver = new IntersectionObserver((entries) => {
entries.forEach((item) => {
if (item.isIntersecting) {
console.log(‘进入可视区域’);
}
})
});
intersectionObserver.observe(box);
2.1 IntersectionObserverEntry对象
-
target: 被观察的目标元素,是一个 DOM 节点对象 -
isIntersecting: 是否进入可视区域 -
intersectionRatio: 相交区域和目标元素的比例值,进入可视区域,值大于0,否则等于0
2.3 options
-
threshold: 决定了什么时候触发回调函数。它是一个数组,每个成员都是一个门槛值,默认为[0],即交叉比例(intersectionRatio)达到0时触发回调函数。用户可以自定义这个数组。比如,[0, 0.25, 0.5, 0.75, 1]就表示当目标元素 0%、25%、50%、75%、100% 可见时,会触发回调函数。 -
root: 用于观察的根元素,默认是浏览器的视口,也可以指定具体元素,指定元素的时候用于观察的元素必须是指定元素的子元素 -
rootMargin: 用来扩大或者缩小视窗的的大小,使用css的定义方法,10px 10px 30px 20px表示top、right、bottom 和 left的值
console.log(entries);
}, {
threshold: [0, 0.5],
root: document.querySelector(‘.container’),
rootMargin: “10px 10px 30px 20px”,
});
observer.observer(nodeTwo); //观察nodeOne和nodeTwo
observer.unobserve(nodeOne); //停止观察nodeOne
observer.disconnect(); //没有观察任何节点
如何在React Hook中使用IntersectionObserver
this.$bottomElement = React.createRef();
…
componentDidMount() {
this.intiateScrollObserver();
}
intiateScrollObserver = () => {
const options = {
root: null,
rootMargin: ‘0px’,
threshold: 0.1
};
this.observer = new IntersectionObserver(this.callback, options);
this.observer.observe(this.$bottomElement.current);
}
render() {
return (
<li className=‘img’ ref={this.$bottomElement}>
)
}
原理
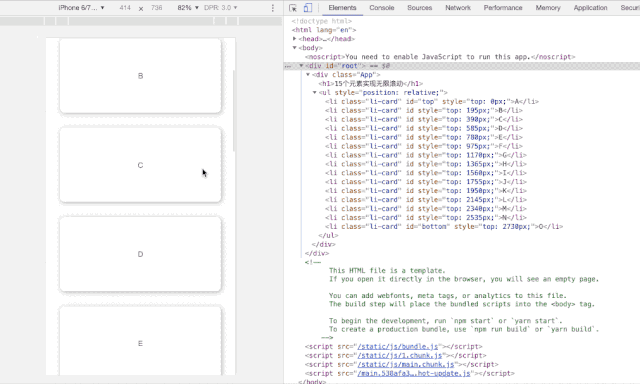
即在任何时候,无限滚动n元素上也仅存在15个DOM节点。

-
采用relative/absolute 定位来确定滚动位置 -
追踪两个ref: top/bottom来决定向上/向下滚动的渲染与否 -
切割数据列表,保留最多15个DOM元素。
useState 声明状态变量
const SlidingWindowScrollHook = (props) => {
const [start, setStart] = useState(0);
const [end, setEnd] = useState(THRESHOLD);
const [observer, setObserver] = useState(null);
// 其它代码…
}
2. 变量解析
-
start:当前渲染的列表第一个数据,默认为0 -
end: 当前渲染的列表最后一个数据,默认为15 -
observer: 当前观察的视图ref元素
useRef 定义追踪的DOM 元素
const $topElement = useRef();
内部操作方法和和对应useEffect
// 定义观察
intiateScrollObserver();
return () => {
// 放弃观察
resetObservation()
}
},[end]) //因为[end] 是同步刷新,这里用一个就行了。// 定义观察
const intiateScrollObserver = () => {
const options = {
root: null,
rootMargin: ‘0px’,
threshold: 0.1
};
const Observer = new IntersectionObserver(callback, options)
// 分别观察开头和结尾的元素
if ($topElement.current) {
Observer.observe($topElement.current);
}
if ($bottomElement.current) {
Observer.observe($bottomElement.current);
}
// 设初始值
setObserver(Observer)
}
// 交叉观察的具体回调,观察每个节点,并对实时头尾元素索引处理
const callback = (entries, observer) => {
entries.forEach((entry, index) => {
const listLength = props.list.length;
// 向下滚动,刷新数据
if (entry.isIntersecting && entry.target.id === “bottom”) {
const maxStartIndex = listLength – 1 – THRESHOLD; // 当前头部的索引
const maxEndIndex = listLength – 1; // 当前尾部的索引
const newEnd = (end + 10) <= maxEndIndex ? end + 10 : maxEndIndex; // 下一轮增加尾部
const newStart = (end – 5) <= maxStartIndex ? end – 5 : maxStartIndex; // 在上一轮的基础上计算头部
setStart(newStart)
setEnd(newEnd)
}
// 向上滚动,刷新数据
if (entry.isIntersecting && entry.target.id === “top”) {
const newEnd = end === THRESHOLD ? THRESHOLD : (end – 10 > THRESHOLD ? end – 10 : THRESHOLD); // 向上滚动尾部元素索引不得小于15
let newStart = start === 0 ? 0 : (start – 10 > 0 ? start – 10 : 0); // 头部元素索引最小值为0
setStart(newStart)
setEnd(newEnd)
}
});
}
// 停止滚动时放弃观察
const resetObservation = () => {
observer && observer.unobserve($bottomElement.current);
observer && observer.unobserve($topElement.current);
}
// 渲染时,头尾ref处理
const getReference = (index, isLastIndex) => {
if (index === 0)
return $topElement;
if (isLastIndex)
return $bottomElement;
return null;
}
渲染界面
const updatedList = list.slice(start, end); // 数据切割const lastIndex = updatedList.length – 1;
return (
<ul style={{position: ‘relative’}}>
{updatedList.map((item, index) => {
const top = (height * (index + start)) + ‘px’; // 基于相对 & 绝对定位 计算
const refVal = getReference(index, index === lastIndex); // map循环中赋予头尾ref
const id = index === 0 ? ‘top’ : (index === lastIndex ? ‘bottom’ : ”); // 绑ID
return (<li className=“li-card” key={item.key} style={{top}} ref={refVal} id={id}>{item.value}</li>);
})}
</ul>
);
如何使用
import ‘./App.css’;
import { SlidingWindowScrollHook } from “./SlidingWindowScrollHook”;
import MY_ENDLESS_LIST from ‘./Constants’;
function App() {
return (
<div className=”App”>
<h1>15个元素实现无限滚动</h1>
<SlidingWindowScrollHook list={MY_ENDLESS_LIST} height={195}/>
</div>
);
}export default App;
{
key: 1,
value: ‘A’
},
{
key: 2,
value: ‘B’
},
{
key: 3,
value: ‘C’
},
// 中间就不贴了…
{
key: 45,
value: ‘AS’
}
]
const THRESHOLD = 15;const SlidingWindowScrollHook = (props) => {
const [start, setStart] = useState(0);
const [end, setEnd] = useState(THRESHOLD);
const [observer, setObserver] = useState(null);
const $bottomElement = useRef();
const $topElement = useRef();
useEffect(() => {
intiateScrollObserver();
return () => {
resetObservation()
}
// eslint-disable-next-line react-hooks/exhaustive-deps
},[start, end])
const intiateScrollObserver = () => {
const options = {
root: null,
rootMargin: ‘0px’,
threshold: 0.1
};
const Observer = new IntersectionObserver(callback, options)
if ($topElement.current) {
Observer.observe($topElement.current);
}
if ($bottomElement.current) {
Observer.observe($bottomElement.current);
}
setObserver(Observer)
}
const callback = (entries, observer) => {
entries.forEach((entry, index) => {
const listLength = props.list.length;
// Scroll Down
if (entry.isIntersecting && entry.target.id === “bottom”) {
const maxStartIndex = listLength – 1 – THRESHOLD; // Maximum index value `start` can take
const maxEndIndex = listLength – 1; // Maximum index value `end` can take
const newEnd = (end + 10) <= maxEndIndex ? end + 10 : maxEndIndex;
const newStart = (end – 5) <= maxStartIndex ? end – 5 : maxStartIndex;
setStart(newStart)
setEnd(newEnd)
}
// Scroll up
if (entry.isIntersecting && entry.target.id === “top”) {
const newEnd = end === THRESHOLD ? THRESHOLD : (end – 10 > THRESHOLD ? end – 10 : THRESHOLD);
let newStart = start === 0 ? 0 : (start – 10 > 0 ? start – 10 : 0);
setStart(newStart)
setEnd(newEnd)
}
});
}
const resetObservation = () => {
observer && observer.unobserve($bottomElement.current);
observer && observer.unobserve($topElement.current);
}
const getReference = (index, isLastIndex) => {
if (index === 0)
return $topElement;
if (isLastIndex)
return $bottomElement;
return null;
}
const {list, height} = props;
const updatedList = list.slice(start, end);
const lastIndex = updatedList.length – 1;
return (
<ul style={{position: ‘relative’}}>
{updatedList.map((item, index) => {
const top = (height * (index + start)) + ‘px’;
const refVal = getReference(index, index === lastIndex);
const id = index === 0 ? ‘top’ : (index === lastIndex ? ‘bottom’ : ”);
return (<li className=“li-card” key={item.key} style={{top}} ref={refVal} id={id}>{item.value}</li>);
})}
</ul>
);
}
export { SlidingWindowScrollHook };
display: flex;
justify-content: center;
list-style: none;
box-shadow: 2px 2px 9px 0px #bbb;
padding: 70px 0;
margin-bottom: 20px;
border-radius: 10px;
position: absolute;
width: 80%;
}
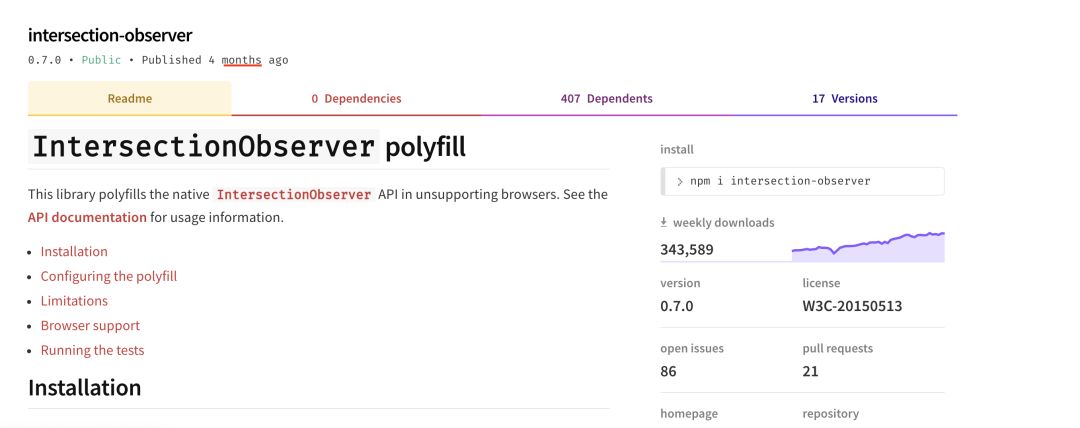
兼容性处理
资料:
- Creating Infinite Scroll with 15 Elements
- IntersectionObserve初试
 微信赞赏
微信赞赏 支付宝扫码领红包